What pressure advance is actually doing
Pressure advance is a feedforward correction that keeps nozzle pressure in step with the motion the slicer asked for. A printer never extrudes at a perfectly constant rate. The extruder pushes filament, the melt compresses, and pressure builds up and drains away with a small delay every time the toolhead changes speed.
That delay is what you see in a print. When the toolhead slows into a corner, the pressure already inside the nozzle keeps pushing for a moment and leaves a bulge. When it accelerates away, the pressure has not caught up yet, so the extrusion goes thin and the corner looks rounded or starved. The sharper the direction change, the more obvious both artifacts become.
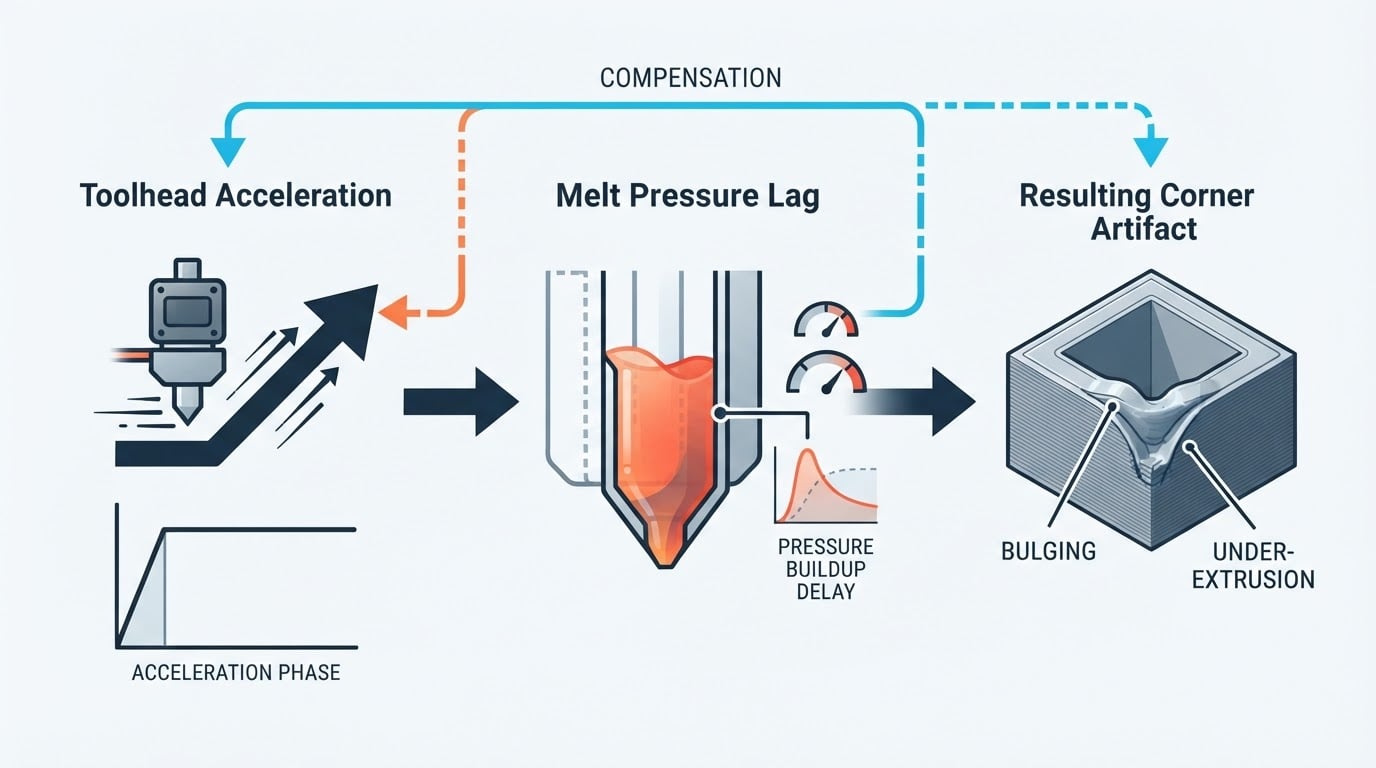
Pressure advance compensates in both directions. It adds early extrusion as the toolhead accelerates and pulls extrusion back as it decelerates, so the pressure delivered to the melt tracks the speed profile instead of lagging behind it. The closer those two line up, the more consistent the line width is, on straight runs and at corners alike.
It is worth being clear about what pressure advance cannot do. It is not a substitute for a correct flow ratio, a clean nozzle, or a mechanically rigid machine. It only shapes how extrusion is distributed around speed changes; it does not change the average amount of plastic being laid down. If the part is uniformly over- or under-extruded, pressure advance will not rescue it.
Pressure advance tuning: the short answers
- What is actually being tuned? How much extrusion is added during acceleration and pulled back during deceleration, so pressure stops lagging behind the motion.
- Which defects does it target? Corner bulges, rounded or starved corners, and line-width changes that show up when print speed changes.
- What should be right before you start? Flow ratio, a clean nozzle, and the print temperature you intend to use.
- Which test should you run? The guided pressure advance test your slicer provides. Orca Slicer's calibration menu covers line, pattern, tower, and Adaptive PA variants, so you can pick the pattern that matches how you prefer to read a result.
- Where does the value live? In the filament profile, so it follows the spool rather than staying tied to one machine.
- When do you re-tune it? When the material or the hardware changes, such as a new filament brand, a different nozzle, or a new hotend.
- Does it replace retraction tuning? No. Retraction manages pressure between moves; pressure advance manages pressure while the toolhead is printing.
Before you run the test
Three prerequisites decide whether your result means anything at all.
Flow ratio first. Flow ratio sets how much plastic the slicer expects per unit of movement. If it is off, the printer is already over- or under-extruding, and the pressure advance test will measure that error instead of the pressure lag you are trying to correct. A pressure advance tune layered on top of a wrong flow ratio will pick a compensating value that looks acceptable in the test but fails on real parts.
Temperature second. Melt viscosity changes how quickly pressure builds and drains, so temperature and pressure advance are linked. Tune the temperature you intend to print at first. A dependency order that works well in practice is temperature, then flow, then pressure advance, then retraction, then maximum volumetric speed. That is also the order the Orca Slicer calibration workflow recommends, which makes sense: each test assumes the previous one is already correct.
Production settings throughout. Run the calibration with the layer height, line width, temperatures, and speeds you actually print with. A value chosen at settings you never use is a value you will never reproduce on a real part.
How to run a pressure advance calibration test
The workflow is short, but each step matters more than it looks.
- Pick the filament profile you plan to keep. Pressure advance is only useful if it is stored somewhere reusable, so start from the profile that will own the finished value.
- Confirm flow and temperature. Re-check the flow ratio and print temperature before you print the test, because a wrong baseline makes the pressure advance pattern unreadable.
- Choose the pressure advance test in your slicer. Orca Slicer groups its guided tests in a single calibration menu, and the pressure advance entry includes line, pattern, and tower styles plus an Adaptive PA option. Menu labels can differ between versions, so follow the labels your own build shows rather than a screenshot from an older release.
- Print the test on the machine you are tuning. Pressure advance is specific to the whole extrusion system, so a test printed on a different printer, a different nozzle, or a different filament tells you nothing useful about the machine in front of you.
- Inspect the physical print, not a photograph. Lighting and camera angle hide exactly the thin-line and bulge differences you are looking for. Hold the test under a light, ideally with a magnifier, and look along the corners and the transitions between them.
- Enter the chosen value into the filament profile, then print a small check part. A single test print confirms the direction, but a part with mixed straight runs and sharp corners confirms that the value survives real geometry.
How to read the pattern and choose a value
You are looking for the transition where the corner is crisp without a bulge and the line after it stays the same width.
A pressure advance test prints the same geometry across a range of compensation levels so the differences sit side by side in one object. That is the whole point of the layout: you are comparing bands, not searching for an absolute reading. Read the row as a sequence and note where the appearance changes, rather than judging any single line on its own.
- Too little compensation shows rounded or starved corners, and the line right after a corner is noticeably thinner than the straight sections.
- Too much compensation shows bulging corners, thickened seams, and sometimes a bump at the point where the toolhead slows down.
- The best band sits between those two failures, where corners and straights look like the same extrusion.
Prefer the middle of the best-looking band over its edge. The edge is where the behavior is already tipping toward one failure mode, so a value from the middle survives small changes in speed, layer height, or ambient temperature far better. If the pattern gives you two separated good bands, treat that as a signal that flow or temperature is still off, not as a choice between two equally valid values.
Once you have picked a value, store it in the filament profile and reprint a small part. If the corners stay clean at the speeds you normally use, the tune is done. If they do not, revisit flow and temperature before you start hunting for another pressure advance value.
How pressure advance interacts with retraction, flow, and temperature
These three settings are the ones most likely to make a pressure advance tune look wrong, so it helps to know what each one owns.
Retraction. Retraction and pressure advance both manage pressure, but at different times. Retraction acts between printing moves, when the toolhead travels and you want the nozzle to stop oozing. Pressure advance acts during printing moves, when speed changes create pressure lag. Because a good pressure advance tune reduces the pressure swings the nozzle carries into a travel move, it can sometimes let you reduce retraction afterwards. It is not a replacement for retraction, and reducing retraction is a follow-up experiment, not part of the first tune.
Flow. Flow ratio sets the average amount of plastic, and pressure advance shapes how that plastic is distributed around accelerations. The two are independent, and they must be tuned in that order. If the flow ratio is wrong, no pressure advance value will produce clean corners, because the test is being asked to compensate for an error that is present on every line.
Temperature. A hotter melt is less viscous, so pressure builds and drains more quickly. That shifts the compensation the extrusion system needs, which is why a significant temperature change deserves a fresh look at the pressure advance value. This matters most when you switch materials, or when a profile change moves the print temperature substantially.
Speed and acceleration. Pressure advance is tied to the acceleration profile, so a value tuned at one speed range is not automatically optimal when you print much faster or change acceleration limits. If you deliberately push speed after a successful tune, reprint the test before assuming the value still holds.
Mistakes that make a pressure advance tune look wrong
Most disappointing tunes are not caused by the pressure advance test itself.
- Tuning before flow. The test then encodes a flow error as if it were pressure lag, and the value usually looks worse on real parts.
- Testing with settings you do not print with. Layer height, speed, and temperature all influence the result.
- Judging from a photo. Thin corners and small bulges disappear on a phone screen. Read the print in your hand.
- Stacking two compensations. Check whether your firmware and your slicer both hold a pressure advance value, and make sure only one of them is applying compensation. Two corrections on the same effect fight each other.
- Blaming pressure advance for a mechanical problem. Loose belts, play in the toolhead, or a partially clogged nozzle produce artifacts that look similar but do not respond to compensation.
- Treating one spool's value as universal. The value belongs to the material and the extrusion system, not to the printer model in general.
Follow-up questions grouped by intent
These are the questions that come up once a first value is in place, with the short answer first.
Understanding the mechanism
- Why do corners bulge if the printer is not over-extruding? Because pressure stored in the melt keeps pushing plastic after the toolhead begins to slow down.
- Why is the line right after a corner so thin? Because pressure has not rebuilt yet when the toolhead accelerates away from the corner.
- Why does the effect change with speed? Faster printing and sharper acceleration create a larger mismatch between commanded motion and delivered pressure.
Setting up the test
- Do I need to re-run the test after changing the nozzle? Yes. A different nozzle changes the extrusion system, so the value needs to be established again.
- Should the test be printed on the printer that will use the value? Yes. Pressure advance is specific to the machine and the filament together.
- Can I reuse a value from a similar filament? Only as a starting point for the test, never as a finished setting.
Choosing and storing the value
- What if no band looks clean? Re-check flow ratio and temperature first; an unreadable pattern usually means the baseline is wrong.
- Should I store the value per printer or per filament? Per filament. In Orca Slicer, pressure advance is kept with the filament profile so it moves with the spool.
- What if the value makes the print worse? Restore the previous profile value and repeat the test; a worse result usually points to a baseline problem rather than a bad test pattern.
After tuning
- Should I retune retraction after pressure advance? It is worth re-checking travel behavior, since a better pressure baseline can change how much retraction you need.
- Does my printer support pressure advance? The slicer prepares the calibration, but the compensation has to be applied by the firmware, so check that your firmware offers an equivalent setting.
FAQ
- Is pressure advance the same thing as linear advance? It is the same idea under different names in different firmware families, so look for the equivalent setting in your firmware documentation.
- Does pressure advance fix stringing? It reduces one source of pressure-related oozing, but stringing is mainly a retraction and temperature problem.
- Does a direct-drive extruder need pressure advance? It benefits less than a Bowden setup because the filament path is shorter, but the pressure lag does not disappear entirely.
- Can I set a value once and forget it? No. It holds until the material, nozzle, or temperature changes, which is exactly when a fresh test is worth the time.
- How long does a tune take? One calibration print plus a check print, which is why it is worth doing properly the first time instead of guessing a value.
- Should I tune pressure advance before or after input shaping? Either order works as long as the machine is mechanically sound and the flow ratio and temperature are already correct.


