One Changes Local Settings, the Other Removes Material
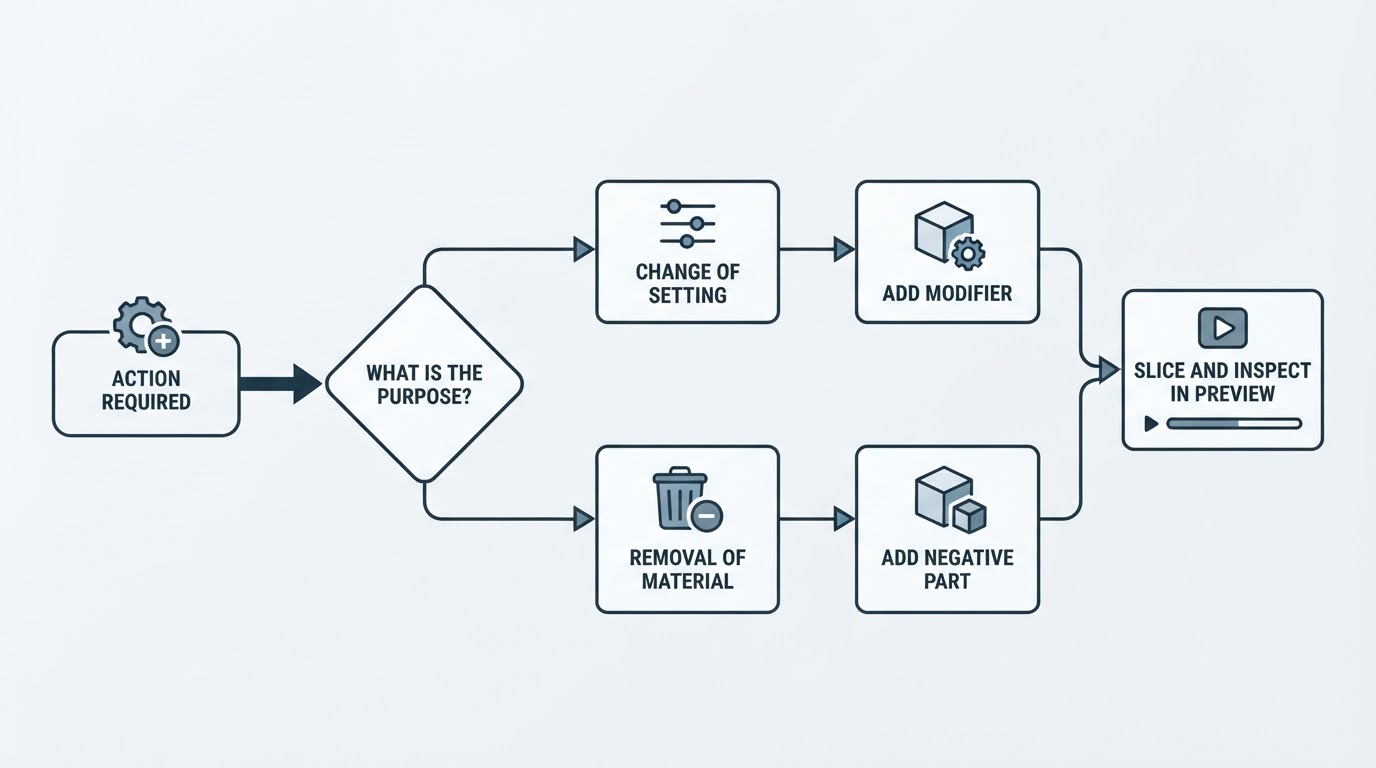
A modifier is a volume that is not printed. OrcaSlicer's own translation glossary defines it as a part added to an object, or a height range, that is not printed but changes the settings where it applies, and the same entry says a modifier is neither a printable part nor a negative part.
The consequence is that the volume's shape marks a region, and the settings you attach to that volume take over from the object's settings inside it. Sparse infill density, speed and wall count become local rules instead of global ones. The height range form does the same job along Z: it applies a band rather than a shape you drag into place, which suits a change that should affect only the top of a tall part.
A negative part works in the other direction. OrcaSlicer's own hint text describes subtracting one mesh from another with the negative part, so you can create easily resizable holes directly in OrcaSlicer. Whatever the parent mesh would have filled inside that volume is skipped, and the surface the cut exposes becomes a new boundary that needs perimeters of its own.
That boundary is the part that surprises people. A negative part is a slicing operation stored in the object, not an edited STL: the source model keeps its original surface, so the volume can be moved, scaled or deleted later and the same file yields a different hole, which is the "resizable" in the hint.
The Menu Entry Sets the Type
OrcaSlicer assigns a volume's type when you add it, and that type decides whether the volume overrides settings or subtracts geometry. The menu table in GUI_Factories.cpp lists Add Part, Add Negative Part, Add Modifier, Add Support Blocker and Add Support Enforcer as separate entries, and a comment beside the table notes that the menu id follows the type of the sub-object being added. The shape comes later and does not change the job: a cube added through Add Modifier stays a parameter modifier, the same cube added through Add Negative Part stays a negative volume.
So confirm the type in the object list after adding, because the row carries it, and that list is also where OrcaSlicer's hints tell you to select objects and parts and change settings for each of them. If the type turns out to be wrong, Change Type can convert the sub-object instead of making you rebuild it; check the object tree afterwards to see what the row now is and where the volume sits in it. Support Blocker and Support Enforcer come from the same menu but steer where support is generated, which is a third job again.
After slicing, the two types separate in a way shape alone cannot fake. A modifier leaves the outline where it was and changes how the inside of its region is printed. A negative part removes the material itself, so the layer inside the volume no longer has the outline the model had.

When the Added Volume Appears to Do Nothing
A modifier applies only where it overlaps material the parent object actually prints, so a volume parked beside the part, above its top surface, or inside a hole you already cut has nothing to override. A height range modifier is bound to the Z band you set; if the band falls outside the printed body there is no region to change. The setting also has to matter in that spot, since raising sparse infill density in an area the slicer fills with solid walls changes nothing visible.
Four things are worth checking before drawing a conclusion: the type of the volume in the object list, which object it is parented to, whether the volume and the printed material actually intersect where you expect, and the setting that applies at that height on the layer you are looking at. A negative part follows the same intersection rule from the other side, removing only the overlap between its own volume and the parent mesh, so one placed beside the model subtracts nothing and one that barely grazes the surface removes a sliver rather than a hole.
The slice is what tells you whether the volume took effect. A missing change in Preview does not by itself mean the feature is broken or that the type is wrong.
Checking the Result Before Printing
Slice the model, then read the result rather than the solid Prepare view. OrcaSlicer's hints note that Prepare and Preview are switched with the Tab key, and Preview is where the layer you care about can be inspected.
The sequence that answers most questions: select the object and confirm the volume's type, position the volume so it overlaps the region you mean to change, set the local parameter on a modifier or the shape of the cut on a negative part, re-slice, then inspect the relevant layers and switch the colour scheme to the parameter you changed. Change one thing at a time, so the difference you see belongs to the volume rather than to something else edited between slices. Re-slice after any move, rotation or resize, because both types are evaluated at slice time.
For a modifier, put the layer inside the volume next to the same layer outside it and check that the parameter you set — infill density, speed, wall count — is the one that differs. For a negative part, look at the perimeters around the cut: the slicer has to wall the surface the subtraction exposes, using the settings that apply at that height and position, so confirm the new boundary is where you meant to put it.
A region-only infill change is a change in the toolpaths for that region. It is not a measured strength result; that would need a physical test.
Choosing Between the Two
If the sentence in your head says more, less, faster or slower, the answer is a modifier. If it says remove, cut, recess or open up, the answer is a negative part.
What you need | Volume to add | What changes after slicing |
|---|---|---|
Denser infill, slower speed or extra walls in one area | Add Modifier | How the region is printed |
A screw hole, slot, recess or cut-out text | Add Negative Part | Whether the material exists |
A different treatment only above a certain height | Height Range Modifier | How the upper band is printed |
Position matters more than size. A modifier has to cover the region whose settings should change, and only the part of it that overlaps printed material has any effect, so a volume covering half a feature changes half of it. A negative part has to match the shape and position of the void you want, because its silhouette becomes the hole.
A Local Override and a Cut, Side by Side
Suppose a part has a boss and you want denser infill around the boss only. A modifier cube placed inside the boss zone with a higher sparse infill density produces denser infill toolpaths inside that zone and unchanged toolpaths outside it after slicing. Nothing else about the part changes, and whether the denser patch makes it stronger is a separate question that needs a physical test, not a slice.
Now clear a hole through the same boss. A negative part cylinder positioned at that location removes the material inside its own volume, and the exposed bore gets perimeters of its own. Moving or resizing the cylinder later moves or resizes the hole, because the cut is still an operation stored in the object rather than a change to the source mesh.
When the Volume Steers Support Instead
Support Blocker and Support Enforcer appear in the same menu but are neither of the two types above: they change where generated support appears, not the local process settings or the part's geometry. If support placement under an overhang is the thing you actually need to fix, start from the support blocker guide rather than adding a modifier to do that job.
Keeping the Operation Editable
Both volumes live in the object, so the project file is what preserves them. A sliced export contains toolpaths for the part as it was sliced, not the modifier or the negative volume that shaped those toolpaths, and whether a given export keeps the original model or carries the volume with it depends on the command and the version you use.
That is the practical reason to save the project whenever the edit might come back. OrcaSlicer's hint sells the negative part as easily resizable holes, and that only holds while the volume is still part of the object you are slicing. Keep the project beside the G-code and the local setting or the hole stays adjustable.