What the retraction test actually measures
Stringing is a retraction problem, and Orca Slicer treats it as a measurement rather than a hunch. The built-in Retraction test generates a retraction tower automatically — a vertical structure with multiple notches, each printed at a different retraction length. The wiki defines the optimal retraction length as the shortest one that produces the cleanest tower (Retraction test – OrcaSlicer Wiki).
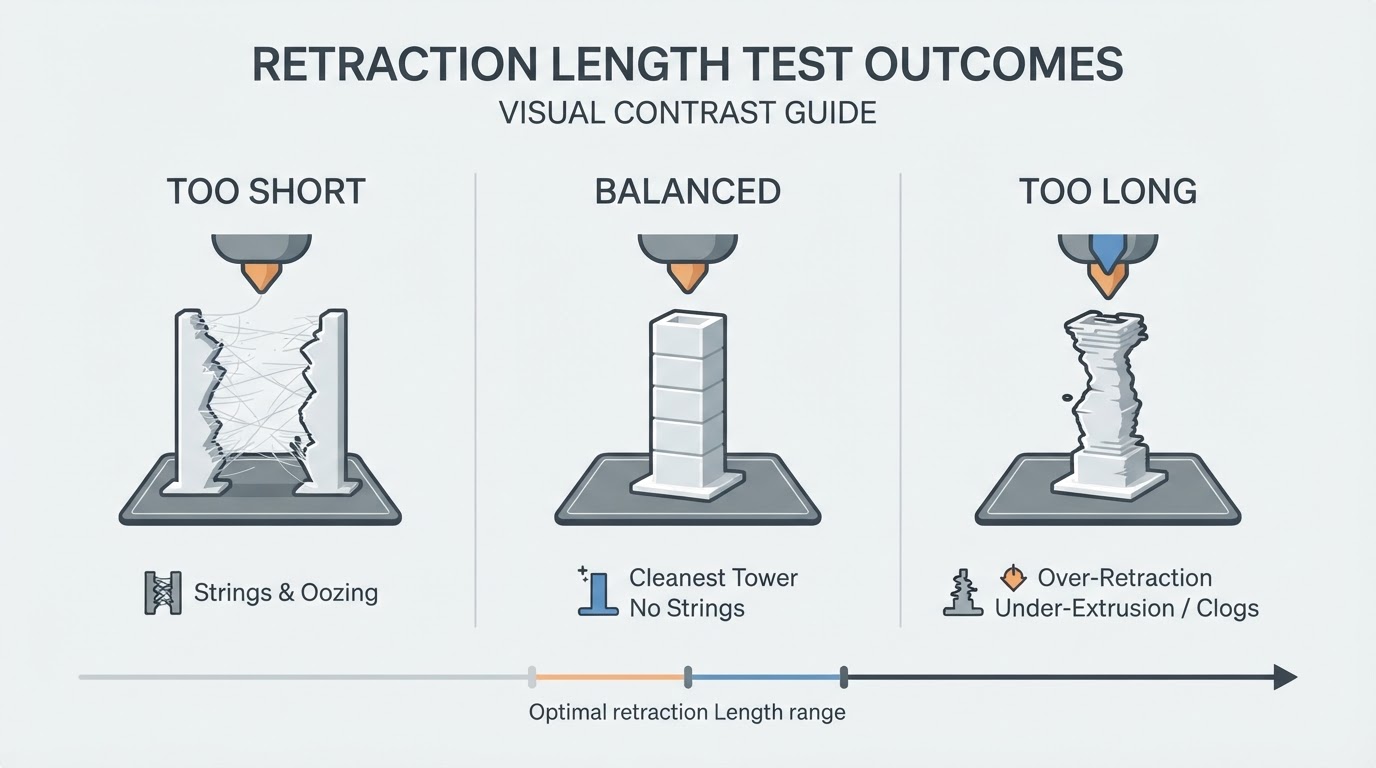
That definition does more work than it first appears. You are not hunting for the band that "looks best"; you are looking for the first band where the stringing has already stopped. Every notch above that point is extra filament movement you do not need, and the excess is not free: the settings reference states that retraction which is too long can lead to clogs or under-extrusion, while retraction which is too short may fail to prevent oozing at all (Retraction – OrcaSlicer Wiki).
The test is also machine-specific by construction. Your nozzle, your filament, your travel behavior and your toolhead geometry are all baked into the printed tower, so the answer it produces is an answer for your setup rather than a number copied from someone else's settings table.
Orca Slicer's in-app Calibration menu is described as a single home for eight guided tests, with the Retraction tower among them and results written back into the filament or printer profile. The official calibration guide credits SuperSlicer as the inspiration for the Flow and retraction tests built into OrcaSlicer (Calibration Guide – OrcaSlicer Wiki).
Before you slice: get the calibration order right
Retraction is not the first test to run. The official calibration guide orders the per-filament tests as Temperature, Max Volumetric Speed, Pressure Advance (with Adaptive Pressure Advance as an advanced option), Flow, and then Retraction, followed by Cornering, Input Shaping and VFA, with Tolerance listed separately. The reason is stated directly: by the time you reach retraction, Flow and Pressure Advance are already dialed in, so the printer is running at optimal extrusion (Calibration Guide – OrcaSlicer Wiki).
The wiki index documents the same family of built-in tests — Temperature, Volumetric Speed, Pressure Advance (plus an Adaptive Pressure Advance guide), Flow Ratio, Retraction and Tolerance, with an advanced group of Cornering (Jerk & Junction Deviation), Input Shaping and VFA — and notes that a Calibration Guide outlines the suggested order of execution (Welcome to the OrcaSlicer Wiki).
Two housekeeping details are worth handling before you print a tower.
Start from an official build. The official download page states that builds come from GitHub Releases, the Microsoft Store and Flathub "nowhere else", and describes nightly builds as built from the latest commits with features that have not shipped yet, potentially unstable. That matters here because one retraction option — the Expert-mode Retract amount after wipe, which splits retraction before and after the wipe — is documented as available only in nightly builds or releases greater than 2.4.2 (Official downloads – OrcaSlicer, Retraction – OrcaSlicer Wiki). On a stable build you may simply not see that field.
Know how to leave calibration mode. The guide instructs users to create a new project after finishing a calibration in order to exit calibration mode (Calibration Guide – OrcaSlicer Wiki). Do that before returning to real parts.
Running the test: three fields, two good starting ranges
The retraction test dialog exposes three inputs — start retraction length, end retraction length, and an increment step (Retraction test – OrcaSlicer Wiki). Those three values define the whole experiment; everything else is your normal print setup.
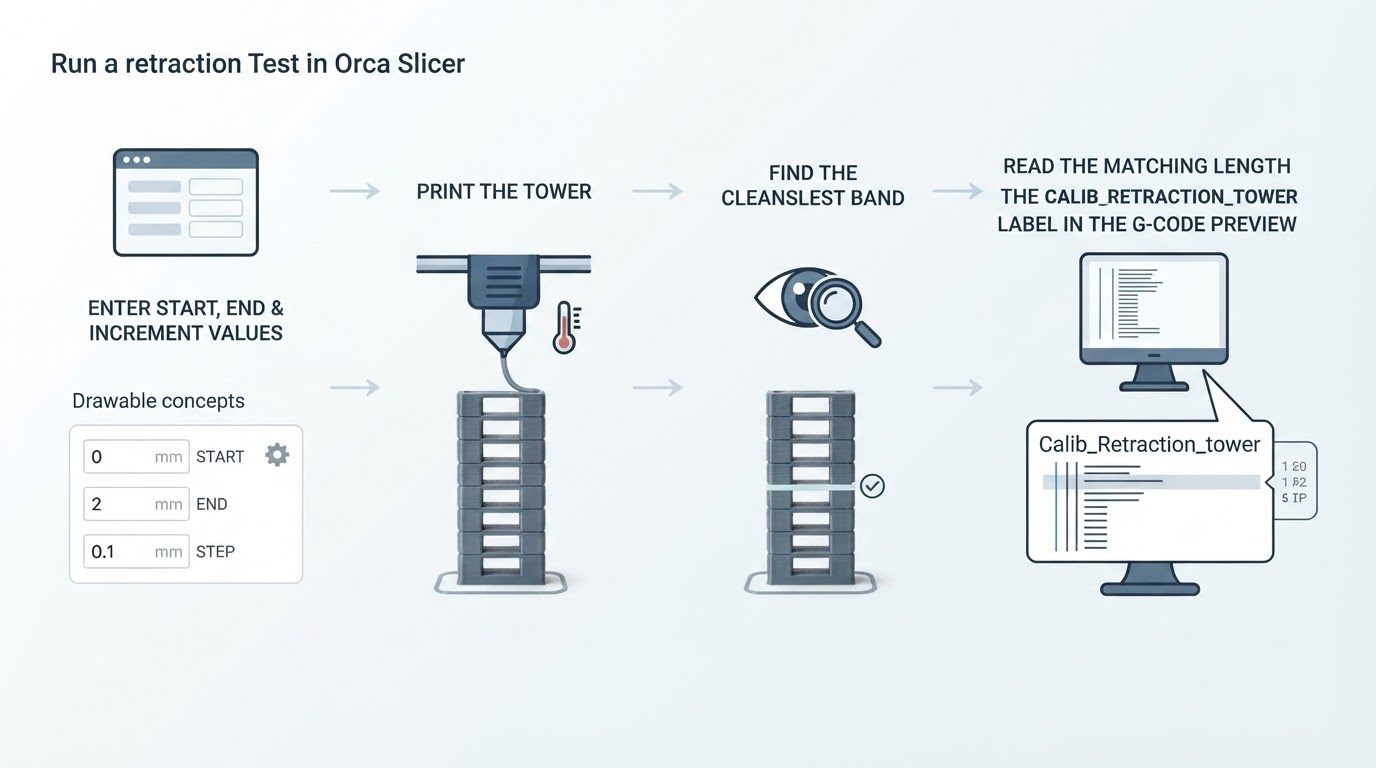
The confirmed defaults are 0 mm start, 2 mm end, and a 0.1 mm step, which the wiki describes as suitable for most direct-drive extruders. For Bowden setups the same page suggests a wider range: 1 mm start, 6 mm end, and a 0.2 mm step.
Direct-drive starting range
Keep 0 mm / 2 mm / 0.1 mm unless you have a reason to widen it. Direct-drive toolheads need very little retraction, and a narrow step gives you finer resolution on the first clean band — which is exactly the value you are trying to pin down.
Bowden starting range
Use 1 mm / 6 mm / 0.2 mm. Bowden setups need more retraction to compensate for the longer filament path, and the wider step keeps the tower from becoming impractically tall. Running Bowden hardware on direct-drive defaults risks clipping the useful result off the top of the range.
The calibration features live in the Calibration section of the interface (Calibration Guide – OrcaSlicer Wiki). Beyond that, exact menu placement can differ between builds and platforms, so treat the dialog fields above as the reliable part and confirm the entry point in your installed version instead of trusting a screenshot from an older tutorial.
Reading the tower without guessing
Reading the print is a three-step procedure, and the steps are deliberately mechanical:
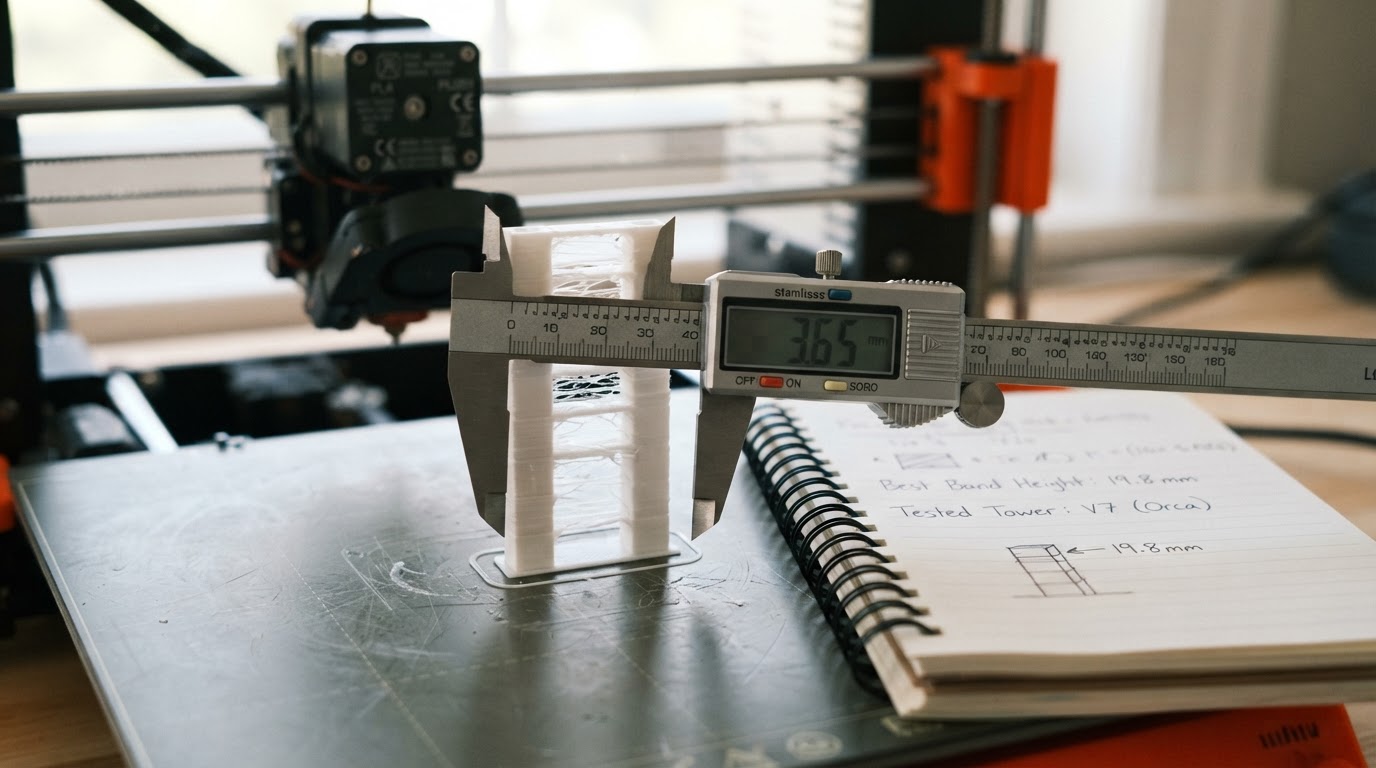
- Inspect the printed tower and find the section with the least stringing and oozing.
- Measure that section's height.
- Search the G-code preview for the
Calib_Retraction_towercomment to find the retraction length that matches that height (Retraction test – OrcaSlicer Wiki).
The third step is the part people skip, and it is the part that turns a band into a number. Do not read the value from the ; retract G-code command: the wiki warns that this command does not contain the full retraction length — for example the Retract amount before wipe value — so the number you see there can understate what the printer actually did (Retraction test – OrcaSlicer Wiki).
When the tower looks clean from the start
If your filament barely oozes, the whole tower can look clean, and that is a legitimate result rather than a failed test. For low-oozing filaments such as PLA or ABS, the wiki states that a retraction length of 0.2 mm–0.4 mm should suffice (Retraction test – OrcaSlicer Wiki). Do not keep extending the range to make later bands look "better"; the shortest clean band is still the target.
What the official page does not publish matters just as much. It gives no recommended retraction speed value, and it describes the tower only as a vertical structure with multiple notches — no dimensions, band counts or layer heights. Any specific "use this speed" or "count the bands" advice from elsewhere is not part of the official documentation and is best treated as untested advice to verify on your own machine.
What to change once you have a number
The measured length belongs in the filament profile that will print the part, not in a one-off project. The wiki notes that the printer's default retraction settings can be overridden per filament through Material Setting Overrides → Retraction, and it links from that settings group to the retraction test as the way to determine the optimal settings for a given filament (Retraction – OrcaSlicer Wiki).
Length is also only one field in a larger group. The wiki documents these related retraction parameters:
- Length (the Simple-mode value the tower measures)
- Extra length on restart
- Retraction speed, and Deretraction speed, where zero means the same speed as retraction
- Travel distance threshold — the distance below which retraction is not triggered
- Retract on layer change
- Wipe while retracting, with a Wipe distance
- Retract amount before wipe (Advanced), and Retract amount after wipe (Expert; nightly builds or greater than 2.4.2)
- Retraction when switching materials
All of those controls live in the same printer/extruder retraction group, and the wiki links the group back to the test as the way to find the right length (Retraction – OrcaSlicer Wiki).
Change one field at a time and re-run the tower. The wiki's trade-off is explicit: too-short retraction may not prevent oozing, too-long retraction can lead to clogs or under-extrusion, and stringing-prone materials such as PETG and TPU may need longer retraction than PLA or ABS (Retraction – OrcaSlicer Wiki). That is why the rule is "shortest clean band" rather than "longest band that still looks acceptable".
Because no official speed value is published, resist bundling a new speed and a new length into one test. If you change speed, wipe distance, or the travel threshold, treat it as a new experiment and reprint the tower so the result still maps to a single variable.
Pitfalls that produce a useless tower
- Reading the wrong G-code comment. Use
Calib_Retraction_tower; the; retractcommand does not carry the full retraction length (Retraction test – OrcaSlicer Wiki). - Fighting wet filament with more retraction. If stringing is still heavy at the top of the tower, the wiki recommends drying the filament and verifying that the nozzle is installed without leaks, rather than only pushing the retraction length higher (Retraction test – OrcaSlicer Wiki).
- Running retraction before flow and pressure advance. The guide's ordering exists so extrusion is already optimal when you get here (Calibration Guide – OrcaSlicer Wiki).
- Staying in calibration mode. Create a new project once the calibration is finished (Calibration Guide – OrcaSlicer Wiki).
- Using direct-drive defaults on a Bowden machine. Start from 1 mm / 6 mm / 0.2 mm instead (Retraction test – OrcaSlicer Wiki).
A completion standard you can reuse
Before you call the calibration done, all of these should be true:
- The tower printed across the full range you entered.
- The cleanest band is identified and its height measured.
- The matching length is cross-checked in the G-code preview via
Calib_Retraction_tower. - The value is stored in the filament profile that will print the part.
- A confirmation print shows no new stringing on travel moves.
- If stringing persisted, filament dryness and nozzle seating were checked before the length was increased again.
That checklist is the difference between producing a number and producing a calibrated profile. The tower only reports the measurement; the profile is what actually stops the stringing on the next print.


