What the Setting Actually Changes
The OrcaSlicer Strength Advanced wiki lists ensure_vertical_shell_thickness as an Advanced-mode choice that adds solid infill near sloping surfaces "to guarantee the vertical shell thickness (top and bottom solid layers)."
The documented purpose is narrow: keeping shell coverage where a surface slopes. It is not a dimensional-precision control, and it does not increase the number of wall loops. Treat it as one shell-coverage option among several, and check its visible effect in Preview rather than assuming what it will do from the name alone.
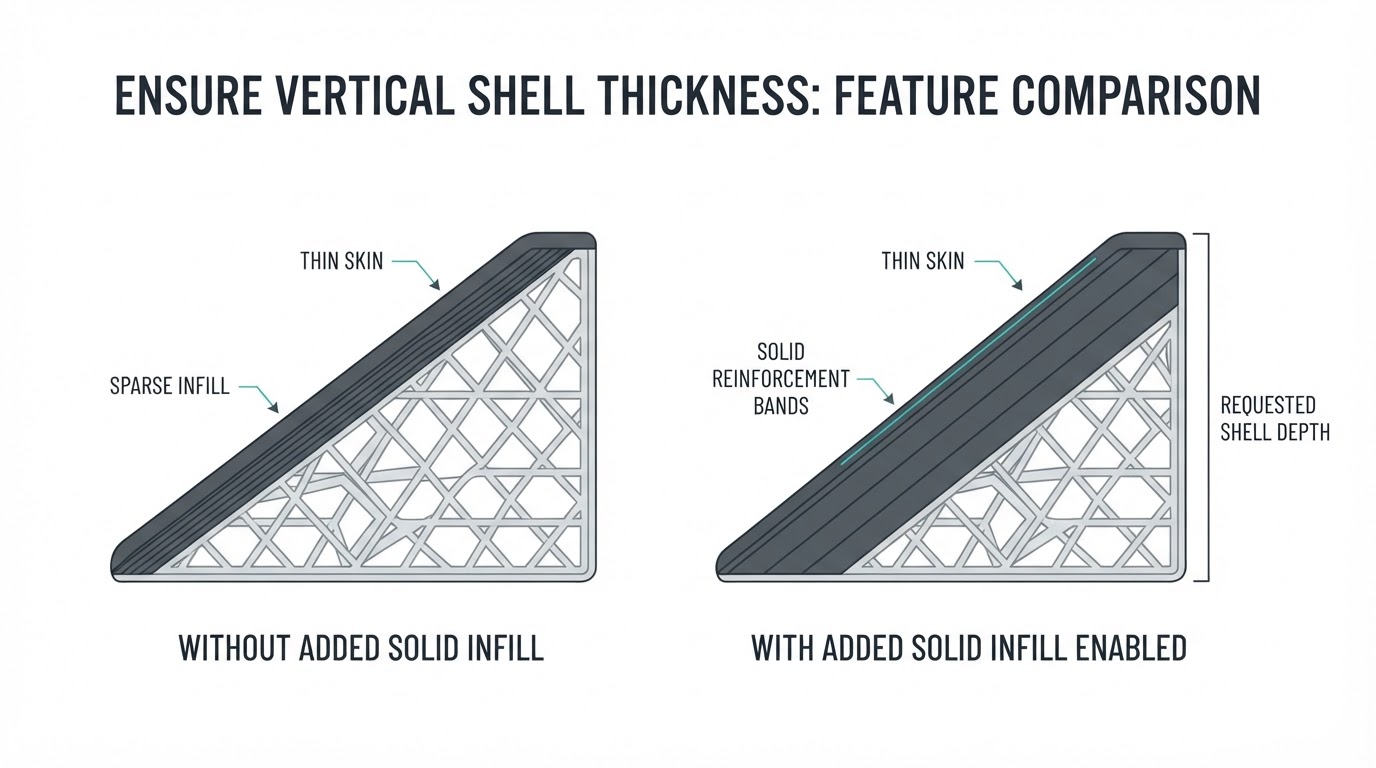
In Preview, the material this option adds is classified as solid infill, so it renders differently from sparse infill. Solid bands under a curved top can come from this option, but they can also come from other slicer controls. Treat the setting as one documented possible source and verify the cause in Preview instead of assuming the bands prove it.
The Four Modes, as Documented
- None: the wiki says no solid infill will be added anywhere. In context, that means no additional solid infill from this feature; it does not disable the solid top and bottom shells defined in your profile. The page also cautions to use this option carefully on models with sloped surfaces.
- Critical Only: avoids adding solid infill for walls.
- Moderate: adds solid infill only for heavily sloping surfaces.
- All: adds solid infill for all suitable sloping surfaces, and the page lists it as the default.
Take "suitable" literally. The page gives no numeric threshold for "heavily sloping," so confirm the control, options, and default in the build and profile you have open; settings can differ between releases and between imported or vendor profiles.
Why Solid Infill Appears Somewhere You Did Not Expect
More than one control can create solid-looking regions. Minimum sparse infill threshold, on the same Advanced page, replaces small sparse areas with internal solid infill. Separately, the shell layer count lives on the Top and Bottom Shells page and sets how deep the solid skin runs. If solid fill appears on a vertical wall with no slope, check those first.
A Controlled Comparison in Preview
Treat this as a proposed check, not a finished test. Use one model with an obvious sloped top or bottom surface and keep the rest of the profile fixed.
- Slice the model as-is, then record the active mode, predicted print time, and predicted material.
- Change only Ensure vertical shell thickness (All to Moderate, then Critical Only) and re-slice each time.
- In Preview, step through the slope layer by layer and note where solid infill appears and where sparse infill sits directly under the surface.
- Compare solid coverage along the slope, then compare predicted time and material across modes.
- Keep the mode whose coverage matches the part's job at a cost you accept, and record it in the profile name or project notes.
Change one setting per comparison. A single changed trial cannot establish causality, and a Preview estimate is not a measured print.
Choosing a Mode
Mode | Documented behavior | How to check your part |
|---|---|---|
All | Solid infill on all suitable sloping surfaces; listed as default | Slice with All, then check in Preview how much fill your slopes gain and what it costs |
Moderate | Solid infill on heavily sloping surfaces only | Compare All and Moderate in Preview; the name alone does not say whether your slope qualifies |
Critical Only | No extra solid infill for walls | Check in Preview whether the fill you would lose sits on wall regions |
None | No additional solid infill from this feature; the top and bottom shells you set still apply | Inspect your slopes in Preview before choosing it; the wiki cautions against using it carelessly on sloped models |
The table summarizes documented behavior, not a strength promise. Use Preview to decide which mode suits the geometry in front of you.
What It Does Not Do
The option is not a dimensional-precision control, and it does not increase the number of wall loops. If your problem is outside dimensions or wall-to-wall overlap, start with the OrcaSlicer Precise Wall guide, which covers what Precise Wall changes in Inner/Outer order and why it is not hole compensation.
Nor is it a fix for sparse infill density. Nothing in the documentation claims that a zero sparse-infill value disables the solid shell behavior described here, and selecting None does not remove the solid top and bottom shells defined in your profile.
Before You Save the Profile
Check three things: the mode is set in the active profile, not just a global preset; top and bottom shell thickness still matches the part; and Preview shows solid coverage where the slope needs it. Then re-slice and confirm predicted time and material are still acceptable. That keeps the setting tied to a visible result rather than habit.


