What seam painting controls in Orca Slicer
Every layer has to start and stop somewhere. That start-stop point is the Z-seam, and when it lands in the same place layer after layer it stacks into the visible vertical line people mean when they say a part has a scar down the side. You cannot delete that point; a slicer can only decide where it goes. If you searched for how to remove seams in Orca slicer, the practical answer is that Orca Slicer gives you control over placement and blending instead of removal.
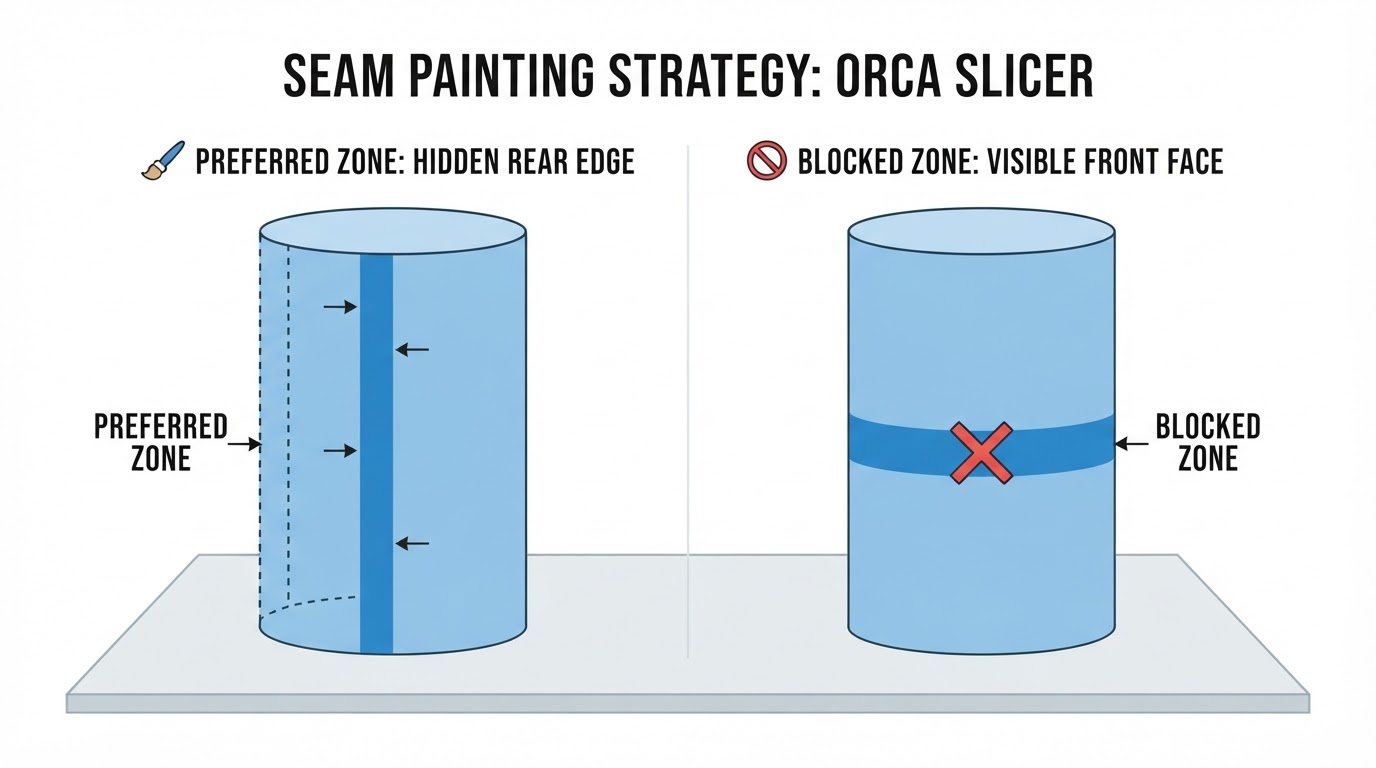
Seam painting is the placement control. The official wiki describes it as a tool that lets you specify areas on the model where seams should be placed or avoided (prepare_seam_painting). In practice you mark two kinds of zone:
- Preferred zones say this is a good place for the layer start: an inside corner, a hidden rear edge, a joint line, the underside of a base.
- Blocked zones say keep the seam away from here: a visible front face, a logo face, a surface the part will be judged on.
Painted zones narrow the choice rather than pinning an exact coordinate. Inside a preferred zone, the slicer still picks the point it likes best according to the seam position setting. That distinction explains the most common surprise: a painted seam that still shifts slightly between layers, or a modifier elsewhere on the wall overriding the painting entirely.
Two habits make painting work better:
- Think in narrow stripes, not broad bands. A thin stripe along the edge you want is a precise instruction; a wide band gives the slicer room to wander.
- Decide before you paint. Turn the model so the faces that matter are visible on screen, then paint the zones those faces imply.
How to paint preferred and blocked zones
The tool is part of the prepare view, and its exact icon, label, brush shortcuts and mode colors differ between Orca Slicer versions, so confirm the current build's controls before following a screenshot from an older guide. The workflow itself is stable:
- Orient first. Rotate the model so the surfaces that will be seen face you. A seam should follow a real edge, so the orientation decision comes before any painting.
- Open the seam painting tool on the selected object. The wiki documents it as a prepare tool for placing or avoiding seams.
- Paint a narrow preferred zone along the hidden edge, inside corner or rear face where the layer start should live.
- Paint blocked zones over the faces you want kept clean.
- Clear a zone and re-paint when a stroke spills past the edge you meant. A wrong zone is more damaging than a missing one, because it pushes the seam somewhere you did not intend.
- Slice and verify in the preview instead of trusting the painted overlay, as described in the next section.
If you want to hide seams in 3D print parts that have no hidden edge at all — a round vase, a figurine, a cosplay shell — painting has little to work with, because there is no discreet place to send the seam. Those parts need a different lever, the scarf joint seam, and the order is still to fix placement first.
Validate the painted zones in the preview
The prepare viewport shows the model and your painted marks; it does not show generated toolpaths. The published walkthrough of support blockers makes the same point about painted masks: a mask that looks perfect in prepare can leave the slice unchanged, and the only reliable check is a fresh slice viewed layer by layer in Preview (orca slicer support blocker). Seam zones follow the same rule.
- Slice the plate after your last stroke.
- Switch to Preview and step from the first supported layer to the last.
- Check whether the seam stays inside the preferred stripe on each wall you care about, and whether any start-stop marks remain on blocked faces.
- Look for the failure modes rather than a general impression: a bulge or dot at the start, a gap or pinhole, or a translucent band where the transition runs.
- Re-slice after every change. A preview from before the edit is not evidence.
The completion check is whether the resulting seam placement is acceptable on the walls that matter. Painting guides rather than guarantees placement, so if it is not acceptable, change one variable at a time.
When seam position or Precise Seam overrides your painting
Painting changes the candidate area; the seam position setting still chooses inside it. Orca Slicer's seam settings page lists five modes — nearest, aligned, aligned back, back and random — and notes that aligned back, aligned or back typically work best, especially in combination with seam painting or Precise Seam modifiers (quality_settings_seam). The modes differ in ways that matter for painted zones:
- Nearest picks the point closest to where the nozzle already is, prefers concave corners and avoids overhangs and visible spots, but scatters the seam around the model between layers.
- Aligned looks for a hidden internal facet, and Aligned back combines that with keeping away from the front, which suits directional models such as sculptures and figurines.
- Back puts the seam at the rearmost point, useful for parts displayed in a fixed orientation.
- Random distributes the start point across layers rather than stacking it into one aligned line; inspect the preview to decide whether the visual trade-off suits the model.
Seam position modes are a general 3D printing idea; what the painting tool adds is a way to constrain that search to the surfaces you choose.
Precise Seam modifiers are a stronger override
The wiki marks Precise Seam modifiers as a new feature, available in nightly builds or releases newer than 2.4.2, so check your build before planning around them (prepare_precise_seam). They attach to an object as a separate helper body and come in two groups.
Strong modifiers (Seam Center, Seam Left, Seam Right) pin the seam to one exact point where the body crosses the outer wall. The Seam Position setting cannot move it, and on a wall a strong modifier crosses, every other point is blocked — weak modifiers and seam painting have no effect there.
Weak modifiers (Seam Enforced, Seam Blocked, Seam Neutral) mark zones like painting seams by hand. The Seam Position setting still chooses the seam, but it prefers the enforced zones and avoids the blocked ones. A weak modifier overrides seam painting inside its zone, and a Seam Neutral modifier clears painted seams where it crosses the wall.
A few more differences are worth knowing before you rely on modifiers:
- They act on the outer walls of each layer, including the walls around holes; inner walls follow the outer seam, so staggered inner seams still apply.
- Scarf joint seam, seam gap and wiping all start from the chosen point, exactly as they would from any other seam.
- In spiral vase mode they have no effect.
- Priority follows the object list: strong modifiers sit above weak ones, and the first strong modifier that crosses a wall wins.
- The helper bodies are saved in the project 3MF, but a build without the feature opens them as ordinary modifiers without settings, so zones do not survive a round trip through an older install.
- If a modifier cannot be applied as intended, slicing shows a warning that begins with "Precise Seam:" and ends with "Seam placement may differ from expected." The messages name the problem, such as a modifier that never reached the middle of the outer wall, whose centerline sits half an outer wall width inside the surface.
Seam painting is not a scarf joint seam
The two controls solve different halves of the problem. Painting decides where the seam goes; a scarf joint seam changes how the start and stop are executed. The official seam settings page describes the scarf option as adjusting the extrusion flow at seam points to create a smooth overlap between the start and end of each loop, with the trade-offs of slightly longer print time and less benefit on sharp corners and overhangs.
Order matters. Place the seam first, then blend it, because a blended seam in the wrong place is still in the wrong place — the artifact just changes shape. When a part has a hidden corner or a rear face, moving the seam is cheap and blending is optional. When every angle is visible, blending is the remaining lever. The published scarf joint seam guide covers that decision in detail, including the cases — thin single-perimeter walls, flat faces, glossy filaments — where a scarf can look worse than a clean seam (scarf joint seam guide).
Seam painting is not support painting
Both tools live in the prepare view and both use painted strokes, which is why they get confused. They drive different systems. Seam painting guides the Z-seam. Support painting marks support enforcers and blockers, and those masks change a slice only when support generation is on and the marked region actually intersects support that would otherwise be generated; a blocker placed where no support was planned changes nothing (support blocker walkthrough). Blocking a face for seams will not remove supports from it, and a support blocker will not move your seam.
Decision table: symptom to first change
What you see or need | First change | Why |
|---|---|---|
The seam crosses a visible face | Block that face and paint a narrow preferred zone on a hidden edge | Painting moves the layer start without changing how the seam is executed |
The seam is placed well but still visible | Check the scarf joint seam options | Blending addresses execution, not placement |
One wall must always start at the exact same point | Use a strong Precise Seam modifier if your build supports it | A strong modifier pins the crossing and the position mode cannot move it |
Painting appears to be ignored on one wall | Check whether a Precise Seam modifier crosses that wall | On a wall a strong modifier crosses, painting has no effect |
Painted zones were lost after a model revision | Switch to Precise Seam modifiers | The modifier is a body and survives edits to the model |
You want the start point scattered to spread stress | Try random seam position | Random distributes the start point layer to layer |
Support scars appear on a face you need clean | Use support painting, not seam painting | The two masks drive different generators |
Common questions
Does seam painting remove the seam? No. It relocates the layer start and stop. The mark can be made far less visible through where it is placed and how the transition is executed, but it cannot be deleted.
Do I need a recent build? Seam painting is documented in the prepare tools of current releases. Precise Seam modifiers are the part with the version caveat: nightly builds or releases newer than 2.4.2.
Why did my painted seam move anyway? Because painting guides rather than pins. The position mode still chooses within the zone, another modifier can override it, and the preview after a fresh slice is the only place to see what the slicer actually did.
A completion check you can repeat
Finish with a check that does not depend on guesswork:
- Slice the plate after the last change.
- Step through every layer in Preview on the walls that matter, not just the layer where the seam looks right.
- Confirm the seam stays inside the preferred zone and off the blocked faces.
- Look for a dot, a gap, a translucent band or a thinned wall at the seam.
- If anything fails, change one thing — the zone, the position mode, or the blend — and start again.

Placement first, preview second, blending third. That order is what separates Orca Slicer seams that read as a defect from seams that nobody notices.


